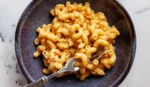
This carnitas mac and cheese recipe may be the best game day recipe of all time. Flavorful shredded pork adorns rich, gooey mac and cheese. It’s a once-per-year affair for us, but it’s totally worth it. This recipe is also perfect for any event where you need to serve a crowd and want to impress the heck out of them.
I’ve made this for various parties multiple times, and it’s always the hit of the evening. With reviews like this, why wouldn’t you want to add it to your game-day rotation?


How to make my carnitas mac and cheese:
This recipe does take a while to make, but most of the time is inactive. I recommend starting the carnitas the night before. Simmer the pork until it’s very tender, let it cool, and then refrigerate overnight. You’ll be able to remove the fat layer the next day much more easily.
Traditionally, you’d braise carnitas in lard, but given the application here with the rich mac and cheese, I opted to simmer them in water (chicken stock would also work). I like to evaporate all of the liquid and then broil. I find it creates a really deep flavor.

What you need
- Pork shoulder or pork butt: I use a boneless pork shoulder, but the butt (also part of the shoulder that includes a bit of the upper leg) would work well. You can use bone-in, but the boneless is easier to work with, in my opinion. For a little extra something-something, I add crispy bacon at the end. If you’re not a pork fan, this would also work well with a chuck roast or a whole chicken. Vegetarian? Fear not; there’s an option for you too! Omit the bacon, shred up some oyster or king trumpet mushrooms, and skip straight to the roasting part.
- Spices and aromatics: For the carnitas, you’ll use an onion and bay leaf. For brightness, I add grapefruit or orange juice. I use Sweet Chilifire from Spicemode, but you can use your favorite spice blend here. You can DIY it with a homemade spice mix or snag a carnitas rub online. You could even take a BBQ route with this if that’s the flavor profile you want!
- Mac and cheese: This recipe rounds up the usual suspects. Butter, flour, plenty of cheese, and elbows or shells. I love the fat lumache shape or the even bigger lumaconi for this, but you should use your favorite mac and cheese pasta shape here. I always add a dash of white pepper and cayenne to my mac and cheese to round out the flavors.
How to make it
- Step 1: Season your pork and fry it up! You want a nice sear on all sides. Throw in all your aromatics and cover with water. Season liberally with salt and pepper. Bring to a boil and then cover and simmer for 3 hours. At this point, the pork should be fairly tender. Remove the lid and simmer for an additional 30–45 minutes to reduce the liquid further. At this point, I prefer to refrigerate overnight so I can remove the fat layer the next day. You can also forge straight ahead with the recipe as-is if you prefer.
- Step 2: Shred the pork and remove the fat layer from the pot. Add the pork back to the pot and simmer it until any liquid from the pot fully evaporates. While the shredded pork finishes cooking, fry up some bacon in a separate skillet and then crumble it into pieces.
- Step 3: Broil it up! Add the bacon to the shredded pork and then arrange everything on a sheet pan. Broil until you see nice crispy edges across the top of the pork.
- Step 4: Mac and cheese! Make the mac and cheese and transfer it to a big baking dish.
- Step 5: Finish it up! Arrange the carnitas on top of the mac and cheese and transfer it to a warm oven just to get everything bubbling hot before serving.

Carnitas Mac and Cheese
Ingredients
Carnitas:
- 3 pounds boneless pork shoulder
- 2 tablespoons Sweet Chilifire spice blend ( or use carnitas spice mix or your favorite BBQ blend)
- 1 tablespoon neutral oil
- 1 yellow onion, peeled and sliced into thin wedges
- 2 bay leaves
- 1 grapefruit or 2 navel oranges, juiced
- 6 slices bacon, optional
- Salt and pepper
- Water
Mac and Cheese:
- 4 tablespoons butter
- ⅓ cup flour
- 1 cup heavy cream
- 1 cup whole milk
- Pinch of ground white pepper, optional
- Cayenne powder to taste
- 1 8- ounce block mild cheddar cheese, shredded
- 1 8- ounce block sharp cheddar cheese, shredded
- 16 ounces elbows or shell-shaped pasta
- Salt to taste
Instructions
Brown the pork shoulder:
- Pat the pork dry and season all over with salt and pepper. Sprinkle one side with 1 tablespoon of the spice blend and use your hands to rub it all over. Flip and add the remaining 1 tablespoon of spices and rub until the shoulder is completely coated with the blend.
- Heat the oil in a large pot over medium-high heat. Once hot, add the pork and cook without moving for 3–4 minutes until a golden crust forms. Flip and cook for 3–4 minutes per side until it is seared on all sides.
- Add the onion, bay leaves, and grapefruit juice. Pour in enough water to fully cover the pork. Season with salt and pepper and bring to a boil.
Simmer the pork:
- Reduce heat to low and simmer, covered, for 3 hours. Remove the lid and simmer, uncovered, for 30–45 minutes to reduce the liquid. Taste and season. The pork should be very tender. At this point, you can let it cool and refrigerate overnight, or you can continue with the recipe as is. I find refrigerating makes it easier to remove the fat. This recipe assumes it has been refrigerated overnight.
Shred the pork:
- Using a spoon, remove the fat layer from the top of the pork. Remove the pork from the pot and shred it with your fingers or two forks. If there are large pieces of fat, you can discard them.
Finish the pork:
- Return the pork to the pot and transfer to the stovetop over medium heat. Let it bubble–uncovered–until all the liquid evaporates. Toward the end of this process, be sure to stir regularly and adjust the heat as needed to prevent the pork from sticking.
Cook the bacon (optional):
- Place the bacon in a cold skillet and turn the heat to medium. Cook, occasionally turning, until all the fat is rendered and the bacon is very crispy. Transfer to a paper towel-lined plate. Once the bacon is cool enough to handle, dice it or crumble it into small pieces.
Broil the pork:
- Mix the crumbled bacon with the shredded pork.
- Turn on the broiler. Arrange the pork on a baking sheet. Transfer to the broiler for 3–4 minutes until crispy edges begin to form on top. Remove from the broiler and cover with foil. Note: At this point, I recommend washing out the pot used for the pork and reusing it for the mac and cheese.
Start the mac and cheese:
- Preheat oven to 400ºF.
- Combine the milk and cream in a large measuring glass.
- Bring a large pot of salted water to a boil and cook the pasta until 1 minute under al dente. Drain and set aside.
Prepare the béchamel:
- In a large pot, melt the butter over medium heat. Once bubbly and frothy, add the flour and stir regularly for 3–4 minutes until it turns golden and has a nutty aroma.
- Turn the heat to medium-low. Add ¼ of the cream and milk mixture to the flour and whisk constantly until a slurry forms. Cook for 1 minute. Add another ¼ of the mixture and whisk it vigorously until combined. Continue adding the milk and cream mixture in increments, whisking after each addition until the sauce is smooth and creamy. Season the sauce with salt, white pepper, and a pinch of cayenne powder to taste.
Finish the cheese sauce:
- Turn the heat to low. Stir a handful of the shredded cheese and stir until melted. Continue adding the cheese in increments until all of the mild and sharp cheeses have been fully incorporated and melted. If it’s too thick, whisk in a splash of milk or cream. Taste and season.
- Add the cooked pasta to the cheese sauce and toss to coat. Turn off the heat.
Bake the carnitas mac and cheese:
- Add half of the mac and cheese to a large baking dish. Add half of the carnitas and toss to coat. Pour the remaining mac and cheese into the dish. Scatter the remaining carnitas on top. Transfer to the preheated oven for 5–10 minutes until the cheese sauce is bubbly, and the carnitas are warmed through again.
To serve:
- Serve with a sprinkle of chili flakes or with minced scallions on top if you like. Enjoy!